Last week, Bluehost, the server on which ddmckinnon.com runs, announced free SSL certificates for all subscribers. Previously, Bluehost required customers to purchase a Dedicated IP for $5.99/month in addition to the SSL certificate for a minimum of $4.17/month. While these numbers are certainly not cripplingly expensive, roughly doubling the cost of my web hosting (I pay $10.99/month for Plus Hosting after somehow getting tricked out of my $3.95/month introductory offer) was not a huge priority for me, despite the nagging of Google Webmaster Tools. The free certificate, however, changed everything. This in and of itself is a rather interesting economic case study, but after Bluehost gave me a gift seemingly valued at $10.16/month I decided to leap into the agony of HTTPS.
Yes, the agony. This may be a slight exaggeration, but configuring an SSL certificate on a Bluehost-hosted WordPress site is a bit of a project. From the time Bluehost generated the certificate to the time my site was fully functional and back online took about three hours of hacking and prodding. I hope this post can help others accelerate the process.
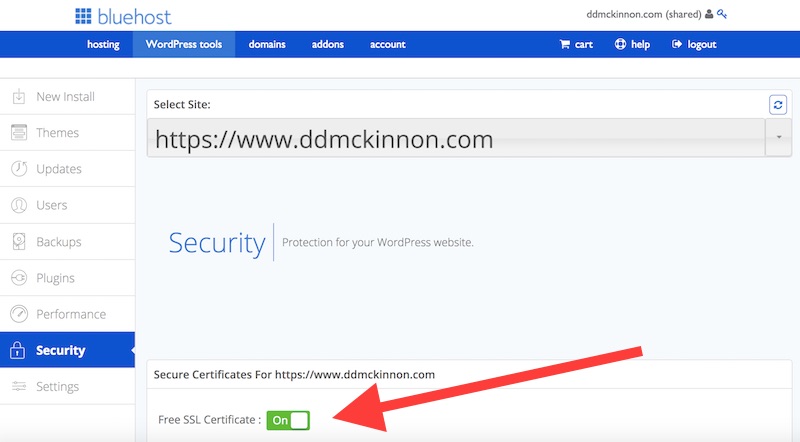
To get your free certificate, log in to the Bluehost WordPress tools dashboard, click Security, and turn on the SSL certificate. While you’re waiting, turn off all caching and CDN. For some reason, I forget to do this every time I monkey with my site, but it is critical for debugging. A cached version of the page will obviously not reflect the most recent changes. Even better, when debugging, browse with the Chrome developer console open and force the browser to hard retrieve a new version of the page with each refresh. This will make life much easier as you wade through these instructions.
Once the SSL certificate goes live, your site may essentially go down. I did not know this, so was quite dismayed to find all of my linked broken and my homepage loaded with a mixed security icon. There is a ton of conflicting information available online that explains how to bring up an SSL certificate on WordPress (I like Harsh Agrawal’s guide as starting point), so I won’t repeat everything that has been published, but I do want to walk through what eventually worked for me after much trial and error.
To get my site back online, I learned that I had to make a few quick edits to the .htaccess file to 301 redirect HTTP links to HTTPS ones, but wanted to understand why. At that point, I had no idea what an .htaccess file was or how I would edit it, but after a bit of searching I learned that every website running on an Apache server (Bluehost uses Apache, which is the dominant server software. Others may use Nginx, which is a higher performance, but more difficult to configure alternative) uses a configuration file called .htaccess to enable or disable features available in Apache’s core functionality. We’ll walk through some of those features below, but link redirection can be controlled at the site level through the .htaccess file, which is exactly the problem at hand.
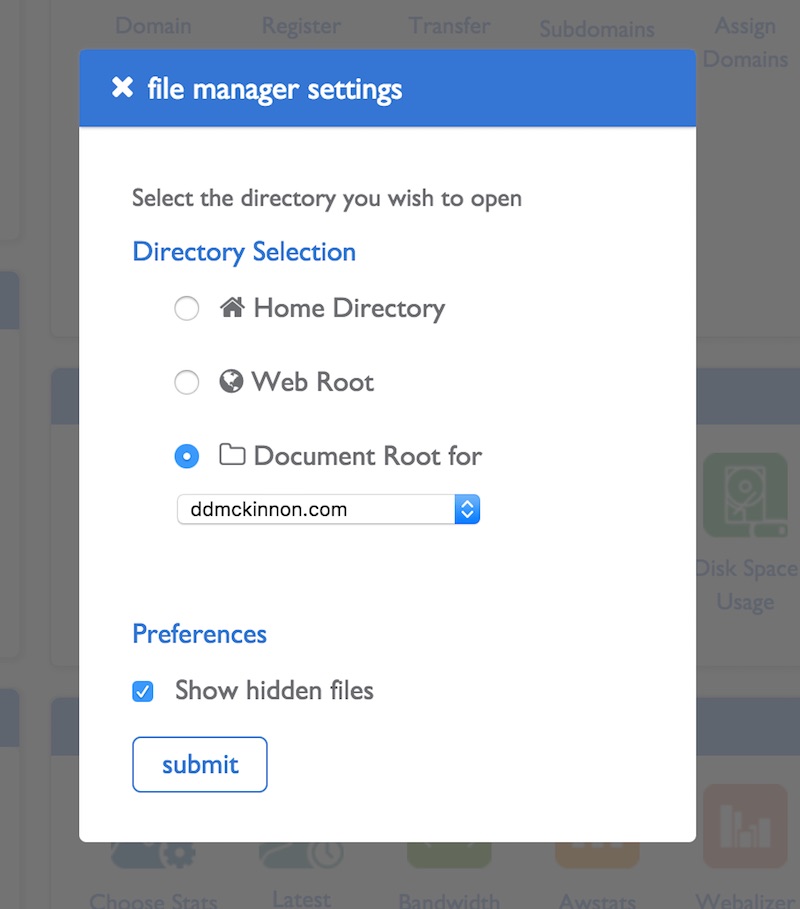
To edit the .htaccess file, you can either set up FTP access to your Bluehost server, which is a pain, or just log in to the File Manager in the cPanel. The .htaccess file is hidden, as announced by the leading period, and sits in the document root for your primary domain, so check those boxes appropriately.
Once inside File Manager, find .htaccess, right click to pull up the options menu, and click Code Edit. Bluehost will pull up a handy little online editor that will make implementing these changes much easier than pulling filing back and forth across FTP. Add
RewriteEngine On
RewriteCond %{HTTPS} off
RewriteRule (.*) https://%{HTTP_HOST}%{REQUEST_URI} [R=301,L]
to the top of your .htaccess config file. This code takes all non-HTTPS requests and redirects them to the HTTPS version of your site. Note that this little snippet of code appears differently across many different websites and there are several ways to set this up, but this one, in particular, worked for me. Now, all users that try to access the non-secure version of your site should get redirected to the secure one. Test the code out by typing in http://www.yoursite.com and seeing an instant redirect to https://www.yoursite.com.
Next, you need to attack all of the broken links that have been introduced by the SSL certificate. Intuitively, with the redirect above, all of your site’s links should continue to work and get a one-hop redirect to the HTTPS version, but for me, they ended up in a weird infinite loop. My homepage and paginated blog pages worked, but links to specific posts or dates all yielded a not found or too many redirects response from the server. To avoid the redirection chaos, it’s necessary to change all of the links, images, and other site assets from HTTP to HTTPS. This would obviously be a tremendous pain to do manually, but the Really Simple SSL plugin comes to the rescue. With a really simple install and activation, it performs all of this automatically. To ensure Really Simple SSL didn’t miss anything, run Better Search Replace on the HTTP version of your site. I found 14 or so stragglers and corrected them all.
Unfortunately, despite completing these steps and combing through every guide on the internet, but links were still broken. My pages appeared inside the WordPress admin console, but their permalinks no longer worked outside the console. This led me to believe that somehow this SSL process affected my permalinks. After a bit of Googling, I found a bit of evidence indicating this may be true and a life-saving page explaining how to reset the permalinks. Fortunately, this is trivial–log in to the WordPress admin page, click Settings –> Permalinks, change the link structure to something else, save changes, change it back to the original settings, and save changes. This process resets the permalinks and solved all of my problems. My site was now back online with a shiny green lock next to the URL letting me know that my SSL certificate was live!

To complete the process, connect the HTTPS version of your site to Google Webmaster Tools and Google Analytics, which is explained really well by Really Simple SSL, and start changing all of your inbound links from social and other properties you control to HTTPS. Viola! You are now in the good graces of Google Webmaster tools and your site is fully secure against even the most nefarious of Russian hackers.
As a little bonus, I also decided to do a little speed maintenance on my site while I was deep in the config files and WordPress settings. The official Bluehost blog has a great step-by-step guide for reducing load times, so I ran through the list and reduced my load time by almost a factor of four!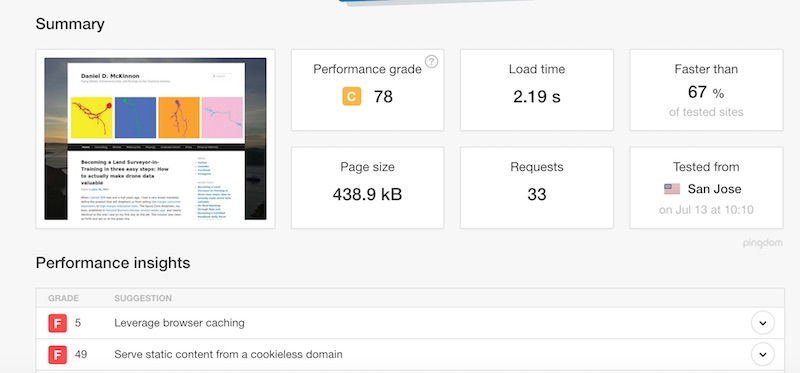
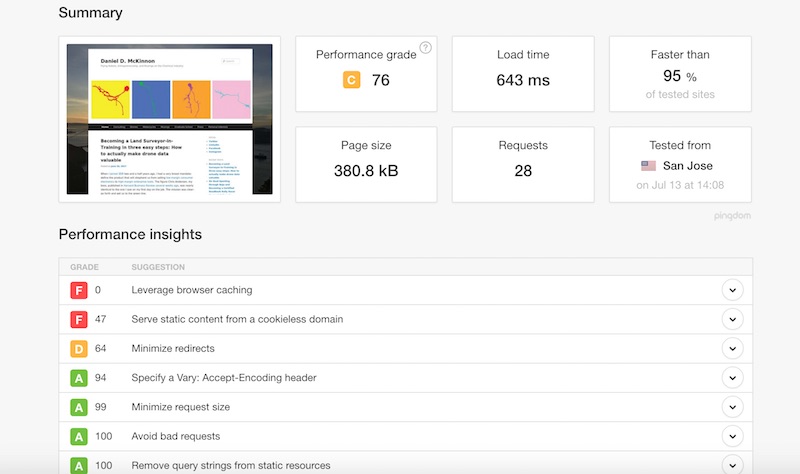
Specifically, for ddmckinnon.com, I reduced the number of requests by removing the Youtube plugin, which pings Youtube on every page load, regardless of whether a video is actually present. In the future, I will just embed GIFs or links to external videos. I also removed the Header and Footer Injection plugin that I was using to serve Google Analytics code and replaced it with the Google Analytics Dashboard for WordPress, which provides more information and loads faster. I also optimized WordPress Super Cache with mod_rewrite using my newfound .htaccess knowledge. Finally, I installed Use Google Libraries, which directs browsers to fetch various js libraries from Google or a local cache rather than WordPress.
I tried to force browser caching using various .htaccess code snippets that are all over the internet, but none of the examples seemed to work. I suspect there is some more complicated interplay between the global configuration settings on my virtual server and what Bluehouse allows with the .htaccess file. This was somewhat confirmed by the fact that GZIP compression is enabled regardless of the specifications I provide. In the future, I believe I can solve all of these problems by activating either the Bluehost CDN or CloudFlare, but that project will have to wait until another day.